![BC[1] how to use an electric smoker:](https://grillsforever.com/wp-content/uploads/2018/01/BC1-696x398.jpg)
If you are looking to cook meat deliciously and in a healthy manner, then smoking is one of the best choices to make. With smoking, you can cook it at a low temperature for a longer duration. This will not only add to the flavor but also prevent the meat from spoiling. There is not a lot you have to know about how to use an electric grill, and we will be covering all the basics ahead.
If you are a fan of that smoked flavor and want to learn how to use an electric smoker, then you have made the right choice. With a top-quality electric grill, you can cook food with the best results without spending too much of your time monitoring it. Let us now see how to use an electric smoker to get the best dishes.
Step 1: Deciding the Type of Smoker You Need
Before you learn using an electric smoker, you should know the particular kind that will work best for you. A vertical electric smoker is inexpensive and works great in warm weathers. On the other hand, they will not maintain the temperature as well in colder temperatures, so you can use them only in the warmer months.
Electric cabinet smoker is that which looks like a small refrigerator. These come with a temperature gauge that makes it easy to keep track of the core tracker. Being able to control the temperature is important with meat being smoked in an electric grill.
Step 2: Thoroughly Read and Understand the Manufacturer Instruction
Every electric smoker has its own set of instructions, and you need to know the ones that best suit yours. Generally, the manufacturer gives all necessary instructions with a booklet along with the product, or you can check the website for this.
Step 3: Season or Cure a New Electric Smoker as Per the Provided Instructions
An important point in learning how to use an electric smoker is to season or cure it, for this removes the solvents, dust and odors that will prepare the smoker to cook your food. Before you season the smoker, coat its indoor surfaces and racks using cooking oil. Then turn it on, letting it run for at least 2 hours. Then turn it off, open the cover and let it cool.
Step 4: Preparing the Meat
What you have to do in this step varies with the meat you are cooking. You may need to marinate it before or do whatever the meat (or the dish being cooked) requires prior to grilling/smoking.
Step 5: Seasoning the Meat
Seasoning the meat using a dry rub, which could be smothering like herbs and salt, sugar or soaking it in an acidic marinade is also essential. Follow this step as per your preferences before you cook it in the electric smoker.
Step 6: Letting the Meat Season Overnight
Once you have seasoned it with the desired herbs or flavors, let it stay overnight. This will help the meat absorb the flavor in the best possible fashion and give you delicious mélange of tastes.
Step 7: Turning On the Smoker and Adding Water
If your smoker has a water receptacle, then add water to it. You can also use a disposable tin container for this, which will remove the hassle of refilling the container after each use. Keep a check on the water content as it may need refilling after a few hours.
Step 8: Purchasing the Right Wood Chips
You can get wood chips easily from any hardware shop, grocery store and even online. However, some smokers only work with certain wood chips, so you should check that prior to purchasing any electric or wood pellet grill. You can purchase alder, plum, hickory, plum, cedar or any other flavor chips that you want in the wood chip container. On an average, it takes around 4 cups or 946 ml of wood chips for 3-5 hours of smoking in a standard electric smoker.
Step 9: Checking the Smoker Temperature
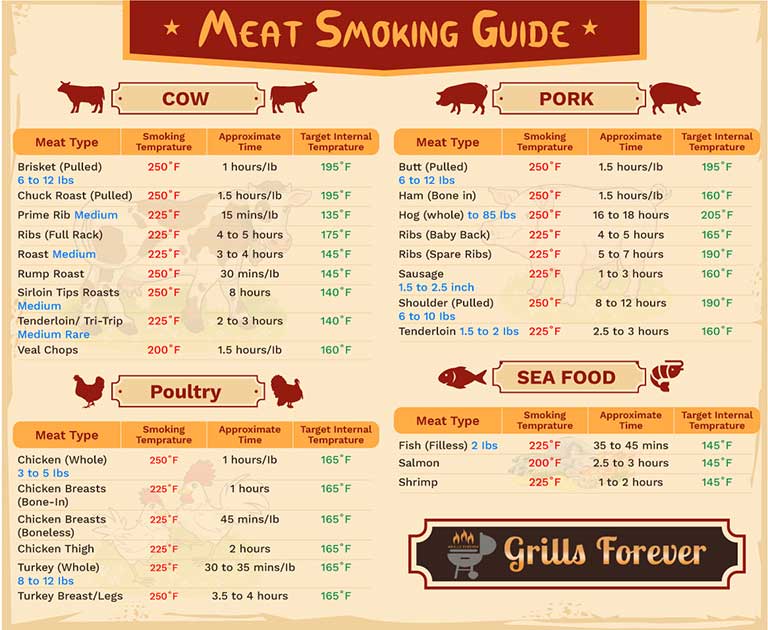
Keeping a check on the smoke temperature is important- and most electric smokers will have an internal temperature gauge for the same. Once you have set the smoker to the desired temperature value, wait for it to reach that level. Do not start cooking until that particular temperature has been achieved. The smoking temperature and time duration depend on the tenderness of the meat. In the following, a smoking temperature guide is provided describing the ideal smoking time and temperature for different sorts of meat cuts.

Copied to Clipboard!
Step 10: Begin!
Once the set temperature is reached, place the meat in the rack. Smoke it until the meat is tender, which could take anywhere between 3 and 8 hours. You can check if the meat is done through a meat thermometer that is inserted in the meat’s center.
Thus, that is all there is in learning how to use an electric smoker. This brief but effective guide here at Grills Forever will help you learn all there is to make the most of your grill so that you can enjoy your favorite gourmet dishes every once in a while!


